

Roti Recipe: How to Make Roti/Chapati
|
|
Time to read 16 min
For Indian families around the world, roti is more than just a staple. It’s a slice of home. Whether it’s paired with dal, wrapped around sabzi, or eaten fresh off the pan with ghee (and sugar at times), roti brings comfort, familiarity, and connection to every meal.
For younger NRIs living outside India, mastering the art of making roti can feel both essential and intimidating. It’s one of those skills you grew up watching but never had to learn, until the day you missed it.
Learning how to make roti or chapati can seem like a daunting task, but our step-by-step roti recipe is here to change that. Whether you’re a first-timer or just looking to improve your technique, we’ll show you how to make soft, puffed rotis from scratch, just like back home. And if you're short on time or tired of imperfect results, meet Rotimatic, the world’s first fully automatic roti maker. It brings the tradition of hand-rolled rotis into the digital age, giving you fresh, homemade rotis at the touch of a button. We will also share details and steps for using the Rotimatic in this blog.
We will take you through everything you need to know – roti recipe and how to make it, both manually and with a little help from smart kitchen tech.
But first, let’s learn a bit more about this beloved Indian cuisine staple.
What is Roti (Chapati)?

Roti, also known as chapati, is a traditional Indian flatbread that’s soft, round, and unleavened, made from just a handful of ingredients: whole wheat flour (atta), water, and sometimes a bit of salt or oil. Cooked on a hot flat griddle called a tava and often finished over an open flame, roti is known for its light texture and signature puff.
Originating in the Indian subcontinent, roti is a staple in millions of homes across India, Pakistan, Nepal, and Bangladesh. There are several versions of roti made with different flours and techniques, offering taste and textural variety. It is commonly eaten with vegetables, lentils, and curries - rolled, torn, or folded to scoop up flavor-packed bites.
Today, roti has traveled far beyond South Asia. From Indian households in the US and UK to restaurants across the world, this everyday flatbread has become a global favorite, valued for its simplicity, versatility, and connection to tradition.
Related Post - Calories in Roti & Other Nutrition Facts
Love the taste of fresh, homemade roti—but not the time, mess, or effort it takes?
Buy Rotimatic NEXT Today
Roti Recipe – Ingredients, Tools & Process
Ingredients

Making roti might seem simple, but it all starts with the right ingredients, and a little love, and sometimes a bit of patience too. These everyday staples are what generations of Indian kitchens have relied on to make the soft, round rotis we all grew up with:
- 2 cups whole wheat flour (atta) – The soul of the roti. Look for stone-ground, chakki atta for that soft texture and earthy flavor.
- ¾ cup water – Helps bind the dough. Add slowly - you’ll get a feel for just how much is enough.
- ½ tsp salt (optional) – Not everyone uses it, but a pinch can enhance the flavor.
- Extra dry flour – For rolling and dusting. It keeps things from sticking as you shape the roti.
- Ghee or butter (optional) – For brushing warm rotis. Adds richness and aroma that takes it up a notch.

Tip: If you’re abroad, many Indian or South Asian grocery stores carry the exact kind of atta you’re used to from home - just ask for "roti atta" or "whole wheat atta."
Essential Tools for Roti-Making
You don’t need a fancy kitchen setup. Just these classic tools that have stood the test of time in Indian households:
-
 Rolling pin (belan) – A smooth, medium-weight one works best. It should feel like an extension of your hands.
 -
 Rolling board (chakla) – Helps you get that perfect circular shape. If you don’t have one, a clean countertop works too.
 -
 Flat skillet or tawa – Cast iron or non-stick, both work. You want even heat and a wide surface.
 -
 Chimta or tongs – Makes flipping easy and keeps your hands safe when puffing rotis over an open flame.
How to Make Roti (Chapati) – The Step-by-Step Process
Learning how to make roti isn’t just about cooking. It’s about recreating a familiar rhythm from home. From mixing the dough to watching that first puff rise, every step holds a bit of nostalgia.
Here's a step-by-step guide to help you make soft, round rotis that feel just right, whether it’s your first time or your fiftieth.
-
Mix and Knead the Dough

In a large mixing bowl, combine 2 cups of whole wheat flour (atta) with about ¾ cup of warm water, adding it slowly as you mix. Add ½ tsp salt (optional). Knead until the dough comes together, then continue kneading for 8-10 minutes until it's smooth, soft, and slightly springy.
Tip: The dough shouldn't be too sticky or too firm. Aim for pliable.
-
Rest the Dough

Cover the dough with a clean, damp cloth or lid and let it rest for 20-30 minutes or at least 10 minutes if you're short of time. This makes the dough easier to roll and results in softer rotis.
-
Divide into Balls

After resting, knead the dough briefly again. Divide it into small, equal-sized balls (about golf-ball size). Roll each ball between your palms to smooth it out, then flatten slightly.
-
Roll Out the Rotis

Lightly flour your surface and rolling pin. Roll each dough ball into a thin, round disc (6-8 inches). Rotate the roti as you roll to maintain a circle and even thickness.
Tip: Keep the rolling light and even, pressing too hard can make the roti stiff.
-
Cook on a Hot Tava
Heat a cast iron tava or flat griddle on medium-high until hot. Place the rolled-out roti on the pan.
- After 10-15 seconds, you'll see small bubbles; at this time, flip once.
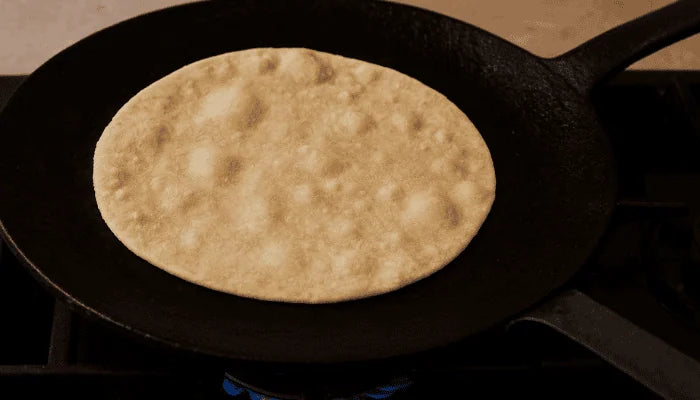
- After 30 seconds, flip again. This side will start puffing up.

- After 10-15 seconds, you'll see small bubbles; at this time, flip once.
-
Puff the Roti

Once the second side is partially cooked, press gently with a spatula or clean cloth to encourage puffing. If using a gas flame, you can lift and expose the roti directly to the flame for full puffing.
-
Stack and Serve Warm

Remove the roti and stack it in a container lined with a towel. Optionally brush with ghee or butter to keep it soft. Keep covered until ready to serve.
Bonus Tip: Autolyse!
If you have a little extra time, here’s a simple trick used by seasoned home cooks and chefs alike: rest the flour and water before kneading, a technique known as autolyse.
All you need to do is mix your flour and water (without salt or oil), and let it sit covered for 20–30 minutes. This helps the flour fully hydrate, making the dough easier to knead and the rotis noticeably softer. After the rest, add salt and knead as usual.
It’s not traditional, but it’s a small tweak that can make a big difference, especially if you’re new to making roti or using firmer whole wheat flour brands found abroad.
In case all of this seems a bit complicated, you can always use Rotimatic which will make the entire roti-making process simple and hassle-free for you, giving you perfect, healthy, homemade rotis in just minutes.
How to Make Rotis/Chapatis With Rotimatic NEXT
Making rotis with your Rotimatic NEXT is as simple as it gets. Rooted in tradition and powered by AI, it brings fresh, hot rotis to your plate at the tap of a button—no kneading, rolling, or guesswork needed. With Vision AI for perfect shaping and Kneading Intelligence for ideal dough, Rotimatic NEXT simplifies the age-old art of roti-making for today’s fast-paced lifestyle. It’s not just smart—it’s care you can taste, even on your busiest days.
Here’s how you can make rotis with Rotimatic NEXT:
-
step1. Place Your Ingredients

Each ingredient - flour, oil, and water - has its own dedicated compartment in the machine. Place them in their designated space. Avoid overfilling the containers.
-
step2. Select Settings

Plug in the power cord and select your desired setting. This includes selecting the flour type, desired thickness, roast level, and number of rotis.
-
step3. Press Start:

Once your settings are selected, tap the Start button on the touchscreen and watch Rotimatic NEXT come to life.
-
step4. Collect & Enjoy:

In about 90 seconds, your first roti is gently dispensed into the collection tray.
Tip: Keep a dry cloth handy to wrap your rotis. This locks in the steam and keeps them soft until you’re ready to serve!
To see exactly how simple making fresh rotis is with the Rotimatic NEXT, watch this video!
100% homemade. 0% hassle.
From dough to delicious—Rotimatic makes it simple.
Buy Rotimatic NEXT Today
Troubleshooting Your Roti-making Dilemmas
Even experienced cooks run into hiccups when making roti. From flat, stiff, or chewy outcomes to rotis that just won’t puff - these little challenges are common. But the good news? They’re easy to fix once you know what’s going wrong.
Below, we’ve broken down the most common roti-making problems and how to solve them, so your next batch turns out soft, round, and restaurant-worthy.
Why Didn’t My Roti Puff?
One of the most common frustrations when making roti is seeing it stay flat, even when you’ve followed all the steps. Don’t worry, it happens to the best of us.
The most likely reason? Uneven rolling. If the edges are paper-thin while the center remains thick, steam can’t circulate properly inside the dough, and that means no puffing. For perfect results, make sure your roti is evenly rolled from edge to edge.
Another common culprit is the dough texture. If the dough is too tight or hard, it won’t be flexible enough to trap steam. Aim for a soft, slightly elastic dough that bounces back gently when pressed.
A few more things to keep in mind:
- The tava needs to be hot enough before you place the roti on it.
- Don’t skip the gentle press with a spatula during the final flip—it helps push steam into the center.
- If you’re puffing directly on the flame, then be gentle and slightly give your roti a nudge when needed to help it puff.
Remember, a few flat rotis are part of the learning curve. Every puffing roti is a mini celebration in your kitchen!
Why Does My Roti Turn Hard or Chewy After Cooking?
If your roti turns out hard, rubbery, or chewy after cooking, it’s usually a sign that something went off in the dough or cooking process.
Here’s what could be causing it:
- Dough too dry or over-kneaded: If your dough is too firm or hasn’t rested enough, the roti will lose its softness as it cools.
- Overcooking: Leaving rotis on the tava too long dries them out and makes them tough.
- Skipping the ghee/butter layer: A light brushing of ghee after cooking can lock in moisture and softness.
- Too much flour while rolling: Excess dry flour can make the surface rough and stiff.
Tip: Use warm water to knead, let the dough rest for at least 20 minutes, and cook on medium-high heat for the shortest time needed to puff and brown.
Why Are My Rotis Not Soft?
Soft rotis start with a soft, well-rested dough and the right cooking technique. If yours feel dry or stiff, consider the following:
- Insufficient resting time: Resting allows the gluten to relax and helps the dough absorb moisture evenly.
- Too little water in the dough: Dry dough = dry rotis. Don’t be afraid to add a little more water to achieve a smooth, pliable texture.
- Not kneading enough: Under-kneaded dough doesn’t develop elasticity, making rotis dense and brittle.
- Rolling too thin: Extremely thin rotis cook too fast and lose moisture quickly, making them dry.
Tip: Try the autolyse technique we talked about earlier; that might just be what you need. Also, store rotis in a covered container or wrap them in a kitchen towel immediately after cooking to retain softness.
Best Tip: For ALL your roti dilemmas, there is one solution - the Rotimatic. It takes away all the work and hassle and with a simple process, gives you flawless rotis in minutes - every time!
Tips, Tricks for Perfect Rotis
As we just shared, using the Rotimatic is the best thing you can do for perfect rotis, but in case you need to make rotis by hand and it seems like a challenging task (especially if you;re a beginner), here are some tips, tricks, and mistakes to avoid for perfect rotis every time:

Use the right flour
The type of flour you use plays a crucial role in the texture and flavor of your rotis. For best results, use high-quality whole wheat flour that is fresh and free of lumps. Avoid using bleached or enriched flour as it can affect the taste and nutritional value of your rotis.

Measure the ingredients accurately
Accurate measurements of flour, water, and other ingredients are essential for making perfect rotis. Use measuring cups and spoons to ensure consistency in your recipe.

Knead the dough properly
Kneading the dough properly is crucial for achieving the right texture and consistency of your rotis. Use warm water to knead the dough and add oil or ghee to make it soft and pliable. Knead the dough for at least 5-7 minutes to activate the gluten and make it smooth.

Rest the dough
After kneading the dough, let it rest for at least 10-15 minutes. This allows the gluten to relax and makes the dough easier to roll out.

Use a clean rolling board and rolling pin
A clean rolling board and rolling pin are essential for rolling out perfect rotis. Dust the rolling board with flour and roll out the dough evenly in a circular shape.

Keep the rotis of even thickness
Ensure that the rolled-out rotis are of even thickness throughout. This ensures that they cook evenly and puff up properly.

Cook the rotis on the right temperature
Cook the rotis on a preheated griddle or tawa on medium-high heat. Too low heat will make the rotis hard, and too high heat will burn them. Cook each side for about 30-40 seconds or until it puffs up.

Press the rotis with a clean cloth
After the rotis puff up, remove them from the heat and press them gently with a clean cloth or a spatula. This ensures that they are cooked evenly and become soft.
Mistakes to Avoid
- Over-kneading the dough can make the rotis hard and difficult to roll out.
- Using cold water for kneading the dough can affect the texture and make it difficult to roll out.
- Rolling out the dough too thin or too thick can affect the texture and cooking time of the rotis.
- Cooking the rotis on low or high heat can affect the texture and flavour of the rotis.
- Not pressing the rotis after cooking can result in hard and dry rotis.
Frequently Asked Questions
What is Roti (Chapati)?
Roti, also known as chapati, is a traditional Indian flatbread that’s soft, round, and unleavened, made from just a handful of ingredients: whole wheat flour (atta), water, and sometimes a bit of salt or oil.
What is the history of roti?
Roti’s name comes from the Sanskrit word rotika, meaning bread. Archaeological finds, like tawas (flat pans) and grain grinders, suggest its use in the Harappan/Indus Valley civilization nearly 5,000 years ago. Over time, it appeared in classical Indian texts and was a staple in Mughal kitchens under emperors like Akbar and Aurangzeb.
Where did roti originate from?
While flatbreads existed elsewhere, the most documented origin of roti is in the Harappan (Indus Valley) civilization of South Asia.
What is roti made of?
Traditionally, roti is made from whole wheat flour (atta), water, and a pinch of salt. Some recipes include a bit of oil or ghee for softness. If you are gluten sensitive, you can even replace wheat flour and make bajra rotis or jowar rotis.
What are the benefits of roti?
Roti boasts numerous health benefits that make it an amazing choice:
Vitamin Supplement: It contains essential vitamins such as B1, B2, B3, B6, calcium, mineral salts, iodine, potassium, and vitamin E.
Heart Health: Roti's high fiber content facilitates optimal blood circulation and helps regulate cholesterol levels. The absence of excessive oil in most recipes further promotes heart well-being.
Digestion Driver: Wheat-based rotis facilitate easy digestion and include bran, which fosters regular bowel movements and may provide protection against irritable bowel syndrome.
Improved Skin Tone: Rotis contain zinc, which may contribute to improved skin quality and a radiant complexion.
Regulated Body Temperature: Incorporating rotis soaked in milk during fever episodes can prove to be comforting and nourishing, potentially reducing body temperature and bolstering vitality.
Are roti, chapati, and phulka the same?
While all three are Indian flatbreads made from whole wheat flour, chapati is thinner and softer than roti, and phulka is a chapati that puffs up over an open flame.
Is roti the same as naan?
No, roti is unleavened and made from whole-wheat flour. Naan is leavened with yogurt and made from refined flour, giving it a soft and chewy texture.
Read our detailed guide: Roti vs. Naan
Is roti gluten-free?
No, since traditional roti is made from whole-wheat atta, it contains gluten. For gluten-free versions, you can use flours like jowar (sorghum), bajra (pearl millet), ragi (finger millet), makki (corn), or buckwheat. Note that these will require gentler handling due to the lack of gluten.
Is roti vegan?
Yes, roti contains only whole-wheat flour, water, and salt, no animal products, making it naturally vegan.
Is roti good for weight loss?
Roti can support weight loss when made with minimal oil and whole-grain flour, since its fiber promotes satiety and steady blood sugar levels.
Can roti be a part of a keto or paleo diet?
Traditional wheat roti is too high in carbs for keto or strict paleo. However, you can make rotis using low-carb flours, like almond or coconut for keto, or millet blends for paleo.
How to reheat roti?
There are three ways in which you can reheat rotis:
Microwave: Wrap in a damp paper towel and heat for 20-30 seconds on medium.
Tawa: Warm each side briefly on a hot skillet at medium heat.
Direct Flame: Use tongs to heat it directly over a low flame until soft.
Can I make roti with non-wheat or gluten-free flours?
Yes, you can. Common alternatives include rice flour, millet flours (jowar, bajra, ragi), and legume flours (chickpea, lentil). These are gluten-free and hold a distinct flavor and additional nutrients.
What to eat with roti?
Roti pairs beautifully with rich curries (e.g., butter chicken, paneer butter masala), lentil dals (dal tadka, dal makhani), and vegetable dishes (aloo gobi, bhindi masala, baingan bharta).
To learn more, see our blog: https://rotimatic.com/blogs/roti/what-to-eat-with-roti
Can I store roti dough for later use? / Can I make roti dough in advance and refrigerate it?
Yes, just cover the dough ball in an airtight container and refrigerate for up to 2-3 days. Let it rest at room temperature for a few minutes before rolling.
What is the best flour for making roti?
Whole-wheat flour, also known as atta, is preferred as it has gluten, making it firmer and easier to roll. It is also the best flour as it yields soft yet sturdy rotis.
How do I store roti dough and rotis?
Here’s how you can store both roti dough and rotis:
Dough: Airtight container, refrigerated 2-3 days.
Cooked rotis: Stack in a cloth-lined basket or wrap in foil/paper towel to retain moisture. It’s best to consume within a few hours or refrigerate.
Can I freeze rotis for later use?
Yes, you can freeze rotis. Simply allow the prepared rotis to cool down to room temperature, place a parchment paper between each roti, create a stack, and place in a freezer bag.
How long can homemade roti stay fresh?
Rotis can stay soft for 6 to 8 hours at room temperature in a sealed container. When refrigerated, they remain usable for 2-3 days, just reheat before serving.
Roti (Chapati) Recipe


Prep Time:
10 minutes
Rest Time:
20–30 minutes
Cook Time:
15 minutes
Total Time:
~45 minutes

Servings:
Makes 8–10 rotis
Cuisine:
Indian
Course:
Main, Bread
Ingredients
- 2 cups whole wheat flour (atta)
- ¾ cup warm water (adjust as needed)
- ½ tsp salt (optional)
- Extra dry flour (for rolling)
- Ghee or butter (optional, for brushing)
Essential Tools
- Rolling pin (belan)
- Rolling board (chakla)
- Flat skillet or tawa
- Indian Chimpta or tongs
Instructions
-
Mix the Dough
Combine wheat flour and salt in a bowl. Slowly add warm water and mix to form a shaggy dough.
-
Knead Until Smooth
Knead the dough for 8-10 minutes until it becomes smooth and soft. Cover and let it rest for 20-30 minutes.
-
Divide & Shape
After resting, knead the dough once more and divide it into 8-10 equal portions. Roll into balls.
-
Roll the Roti
Dust your surface and rolling pin with dry flour. Roll each ball into a thin, even circle (6-8 inches).
-
Cook on a Hot Tava
Place the roti on a hot griddle. Cook for 10-15 seconds, flip, then cook for another 30 seconds. Flip again and gently press with a spatula to puff.
You can also puff it on an open flame using a pair of tongs.
-
Stack & Serve
Stack cooked rotis in a cloth-lined container. Brush with ghee or butter, if desired. Serve warm.
Nutrition Info
Calories:
100–120
Carbohydrates:
18–20g
Protein:
3–4g
Fat:
2–3g (with ghee)
Fiber:
2g
Meet Rotimatic NEXT
The world’s first fully automatic roti maker that kneads, rolls, puffs, and cooks! All in under 90 seconds.
No prep. No guesswork. Just perfect rotis—every single time.
Whether you're a busy working professional or parent, a student abroad, or simply craving that everyday Indian comfort, Rotimatic fits right into your routine.
Explore Rotimatic NEXT and bring home the future of traditional cooking.
Explore Rotimatic Next